Simple Twitter - Chapter 3: Start Coding
In this chapter we're going to open a new repository on GitHub and commit everything to it. We will learn about issues, pull requests (PR), branches, etc. And talk about the way we're going to work with GitHub for the rest of the series. We'll also start a new Angular application with Angular CLI, create the backend project with Node.js and the express framework, and install all the packages we'll need for the client and backend.
1. GitHub Workflow
There are a lot of workflows out there for software development, but 2 of them are the most popular in the git world. The first is git-flow written by Vincent Driessen back in 2010. The second one, and the one we'll be using is GitHub flow.
The reason we choose Github flow instead of git-flow lies in what we build, a web app. We'll not have "releases", not roll back changes, and not support multiple versions of our software. This is because we'll have a CI/CD that will automatically run tests and deploy our changes to production.
It'll probably be a bit wired to work by GitHub flow when we're working alone on the project. But it will keep our master branch clean, and it's important for you to know this workflow and get used to it, because this is how you'll work in a team and in an open source project.
So, every project have a master branch. This is the main branch, the production branch. It's a regular branch, nothing fancy about it, it's just called master (we actually can call it however we want, but this is the naming convention). And when we have a feature, idea, bug, etc we open an issue for it. In the issue we describe the problem, what we're going to do, maybe write some ToDos, upload a picture, discuss about it with other team members, and when we're ready to start working on it we create a branch.
Like we already said, a branch can be called anything, but it's got to be unique in the repo (you cannot have 2 active (not deleted) branches with the same name), and naming things is one of the hardest problems in computer science, so I love to just called it be number, the number of the GitHub issue, because it's also unique in the repo (an increasing number).
When we create a branch in your project, we're creating an environment that don't affect the master branch, so we're free to experiment and commit changes, safe in the knowledge that our branch won't be merged until it's ready.
Branching is a core concept in Git, and the entire GitHub flow is based upon it. There's only one rule: anything in the master branch is always deployable. Because of this, it's extremely important that our new branch is created off of master when working on a feature or a fix.
Once our branch has been created, it's time to start making changes. Whenever we add, edit, or delete a file, we'll make a commit, and adding the changes to our branch. This process of adding commits keeps track of our progress as we work on a feature branch.
Commits also create a transparent history of out work that others can follow to understand what we've done and why. Each commit has an associated commit message, which is a description explaining why a particular change was made. Furthermore, each commit is considered a separate unit of change. This lets you roll back changes if a bug is found, or if we decide to head in a different direction.
Pull Requests initiate discussion about our commits. We can open a Pull Request at any point during the development process: when we have little or no code but want to share some screenshots or general ideas, when we're stuck and need help or advice, or when we're ready for someone to review our work.
In our case, we're going to open a new Pull Request (PR) right after the first new commit in our new branch (all we need to open a PR is just one change, so right after the first commit we have a change and we can open it). This is a good practice, it let others see the direction and progress we are making.
In a real world environment we'll probably have a CI/CD that will deploy our branch to a test environment so we can test our changes before merge them to master, in our case we'll settle just for passing the tests. Every commit we'll push on our branch will trigger a GitHub action workflow that will build our project, run tests and check the coverage of our tests. This is another good reason to push commits as early and as often as possible.
When we'll finish the feature, bug, etc another team member will probably review our code (assuming our tests pass and everything is green). In our case we'll do it to ourselves. Once we're sure everything is good we'll squash and merge our branch to master branch, this will close our PR and our issue (that's good because we no longer have a need for them).
And then in our local machine we'll checkout to master branch, and pull the changes we just merge to the remote (GitHub) master (usually called origin), and the cycle will start all over again with a new issue (feature, bug, etc).
Once merged, Pull Requests preserve a record of the historical changes to your code. Because they're searchable, they let anyone go back in time to understand why and how a decision was made.
Once our web apps are use in production we'll sometimes need to do a quick bug fix, assuming it's an emergency (all hell break loss in our production site) we'll not want to go over the whole process, we'll just want to add one commit to the master branch, and that's it, a really quick fix to fix some production issue.
This will not happen often (assuming we're working correctly, writing test, doing peer code review, etc) but sometimes it will, in those cases we'll just push a commit or two to master and then will have to merge master branch to our PR branch so that they will by in sync and to resolve code conflicts that emerge during the quick fix.
This is how the whole process will look like on our git log:
gitGraph: options { "nodeSpacing": 150, "nodeRadius": 10 } end commit branch feature checkout feature commit commit checkout master commit merge feature
2. Scaffolding Basic Client
Now that we know how to work with git and GitHub are going to open our client repository and scaffold our frontend project. The first commit will be on master (without an issue and a pull request), because when we are open a PR it need a base branch to merge it to, and when we first open a repository we don't have and branch.
2.1. Create A Repository
So let's start by open a new repository on GitHub, we can do it by pressing on the + sign in next to our profile picture, and then choose New repository
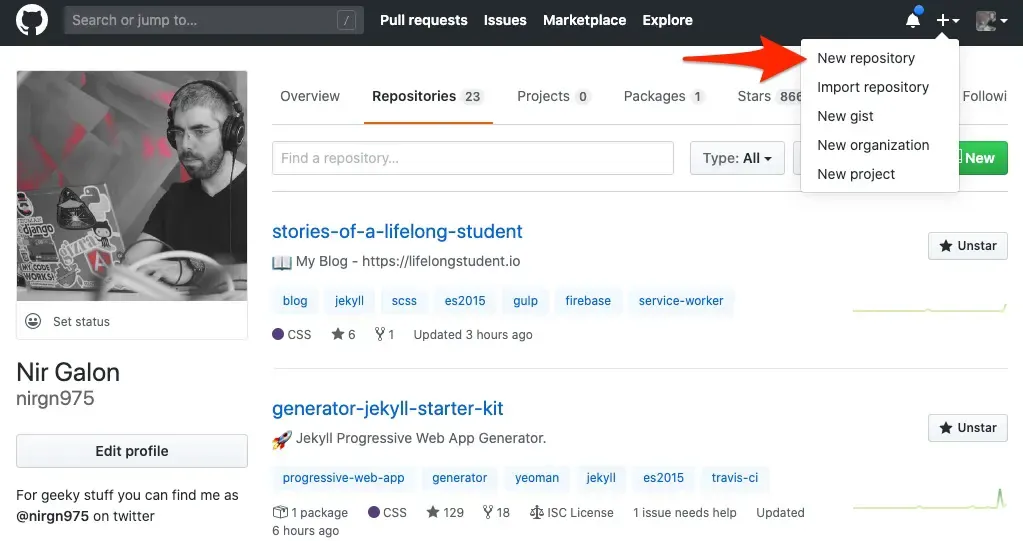
After that we'll be redirect to a new page when we need to fill some basic information about our repo. The name I choose for the repo is simple-twitter-client and it'll be a public repo, other then those you can leave everything as is and press on the big green button that says Create Repository.
2.2. Scaffold an Angular Project
In Simple Twitter - Chapter 1: Setup we installed the Angular CLI, now we're going to use it. Let's open our terminal on our local machine, I'm using Hyper but you can use which ever terminal you used to, and navigate to the directory we want our project to be in (in my case it'll be a web directory in home).
$ cd ~/web
Once we're in the desirable directory we will create a new Angular project, using the Angular CLI. To do that we use the new command and after it give the name of the project (will be the name of the repo we created). After the Angular CLI start to work it'll ask us a bunch of questions, and we'll answer y to the routing one (yes we want the cli to add a routing file for us) and we'll choose SCSS for the stylesheet (don't worry if you don't know scss, it's just like css but with superpowers. We'll go over them once we start coding).
$ ng new simple-twitter-client
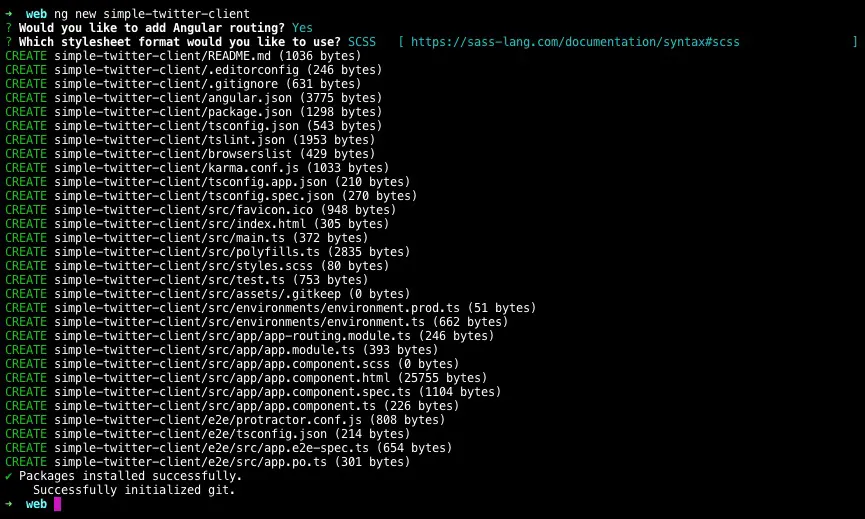
Once the cli stop working we can see (with the ls command) that he created a new directory for us (with the name we gave it earlier). Let's navigate inside it (with the cd command), and, again, list the files inside the directory we're in (with ls command, but now let's use the -a flag to also see all of the hidden files - files and directories that start with . and by that not listed = hidden, in our file explorer).

We can see there is a git directory called .git. This directory hold all of the git stuff for our project, it's like a mini database with a log of all the commits and changes we do. Angular CLI created it for us, but it doesn't know our GitHub repository, we need to manually let our git know about it. So let's head back to the GitHub repo, and there we can see couple of instructions, we'll use the …or push an existing repository from the command line one.
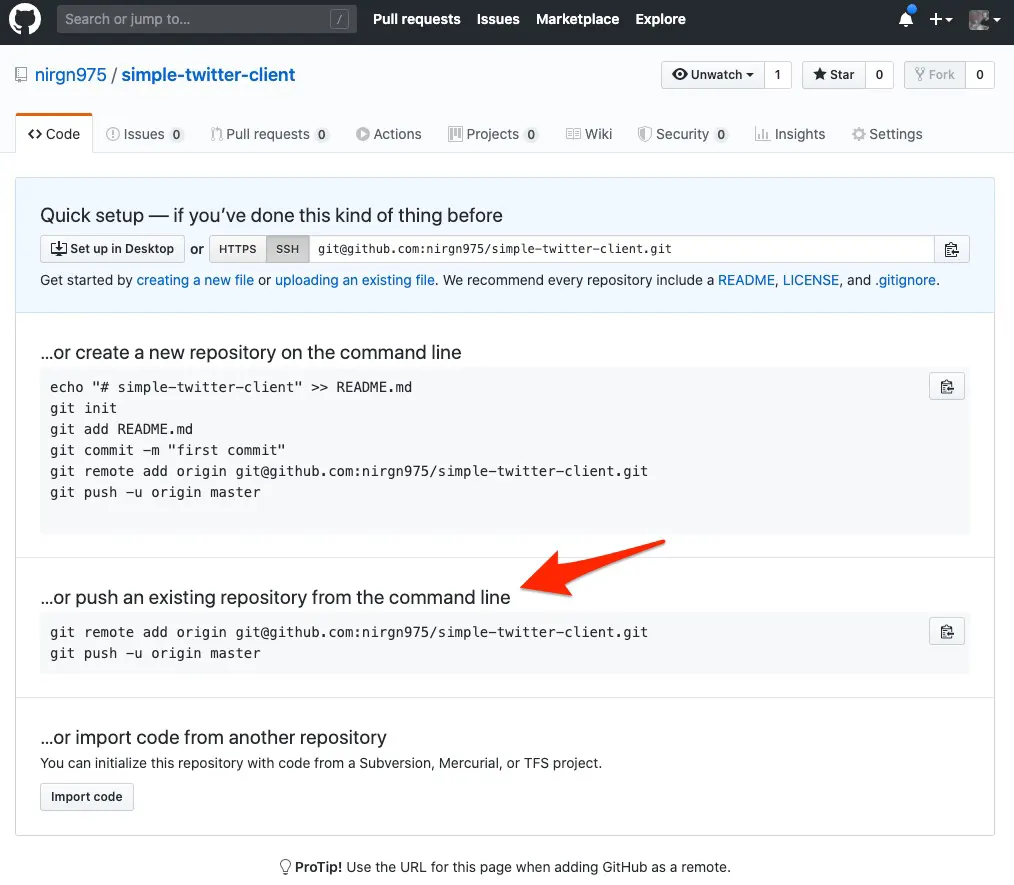
If you haven't setup your SSH key on GitHub yet, generating a new SSH key and then add it to your GitHub account. Now you can clone and push to repos with ssh (you can also do it with https but you'll need to enter your password every time).
So as we can read in the instructions we need to add a remote and we call it origin, this will point to our repo. So every time we'll push a new thing (branch, commit, etc) to origin it'll push it to our remote GitHub repo. Let's do it!
$ git remote add origin git@github.com:nirgn975/simple-twitter-client.git
$ git push -u origin master
If you didn't get any git errors, you can see on your terminal it push your local master branch to the origin (remote, GitHub one) master branch. Now when we go to our repo GitHub page and refresh the page we'll see all of our directories and files.
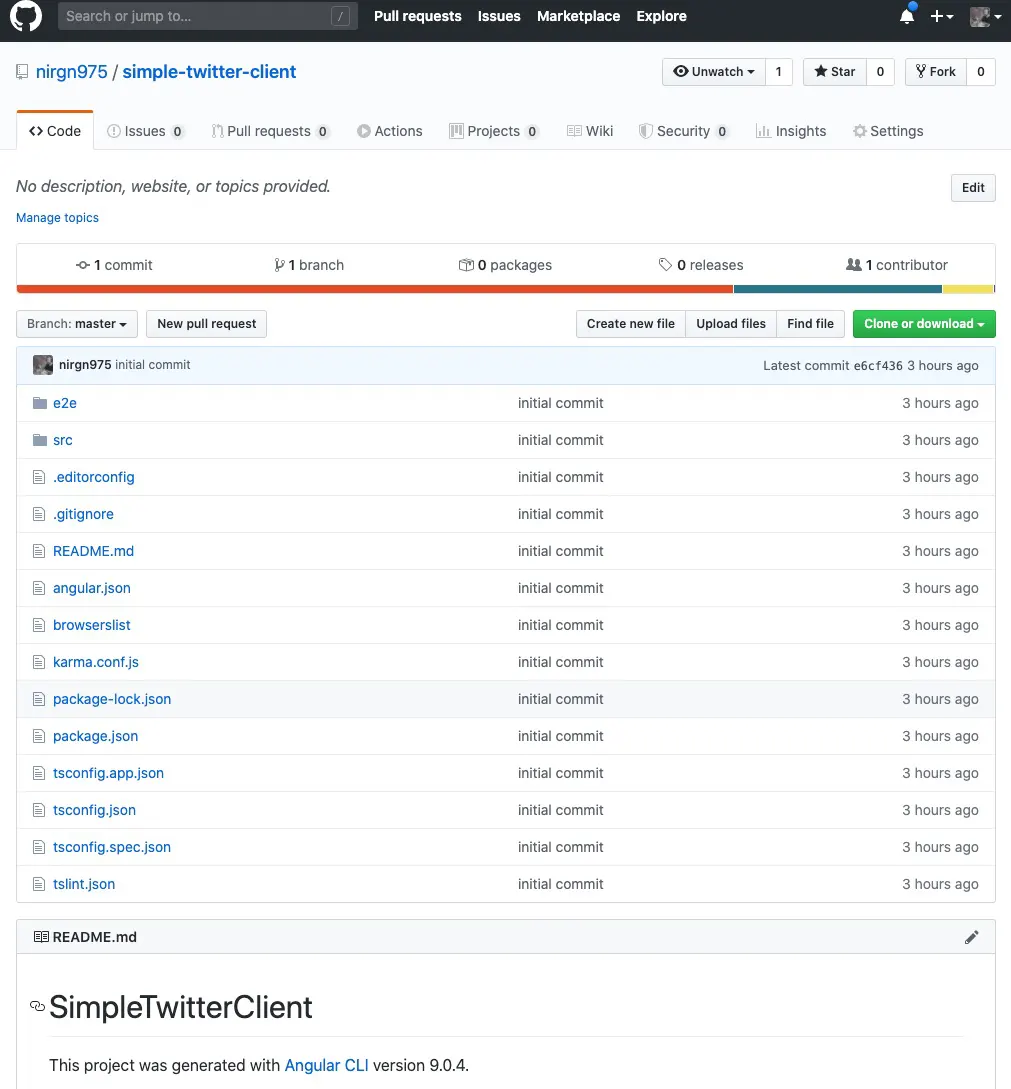
2.3. Install additional modules
Now that we have a master branch with basic Angular project in it, let's create our first issue. I'll give it the title Configuration, and will add some TODOs to it so we don't need to remember our tasks.
- [ ] Install and configure the [ngrx](https://ngrx.io) package.
- [ ] Install and configure the [material](https://material.angular.io) package.
- [ ] Create a `core` module with basic configuration.
- [ ] Add basic SCSS style.
Plus I'll assign this issue to myself (not that it's matter, because we're working alone), add an enhancement label, and add it to Chapter 3 milestone (the last one is just to keep track of things for myself while I'm build it, and to keep things organized in the repo for future readers).
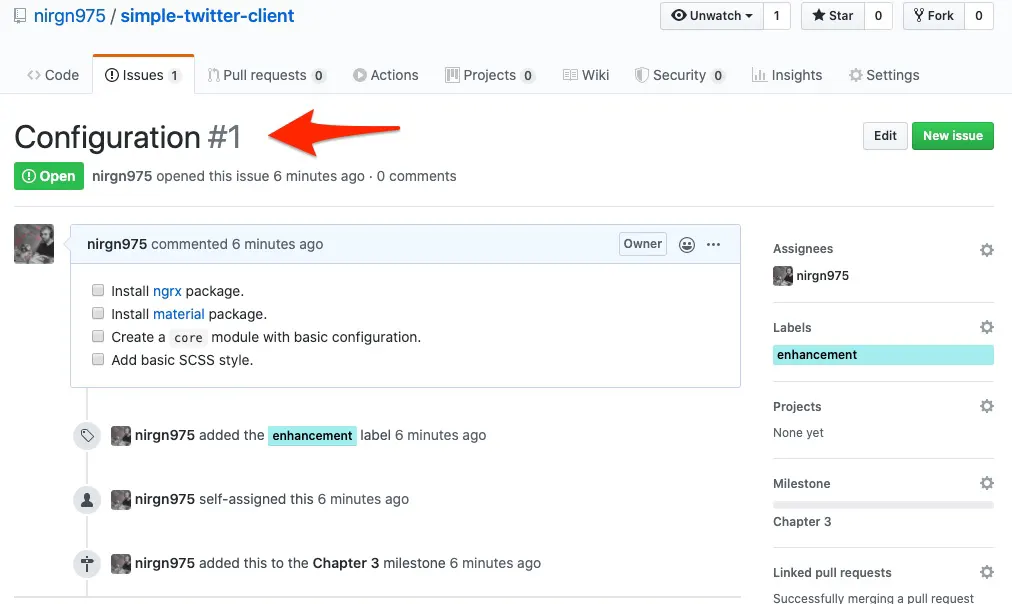
When we created the issue, GitHub give it a unique number, in this case, because it's our first issue / pull request, it the number #1. So, like we mention in the GitHub workflow, we'll create a new branch with the name 1 (with the branch command) and then move from master branch to our new branch (with the checkout command).
$ git branch 1
$ git checkout 1
Now, if you'll type in the terminal git status, it'll tell us we're On branch 1.
The first task is to install the ngrx packages. ngrx as a whole is a state management for Angular applications, and the first package we need to install is the store, which is the state itself. Because we're on angular version higher then 6 we can use the add command to install and configure the package.
After we did that we need to add couple of more packages. The first is the store-devtools so we can see a visual representation of our store and debug it if we need to. The second is the effects which is a way to interact with Angular services and isolate them from the components.
In short, it's the reactive way to handle external interactions (such as fetching data (network requests, web socket messages), long-running tasks that produce multiple events, etc). In the effects you should write most/all of you application "business logic".
$ ng add @ngrx/store
$ ng add @ngrx/store-devtools
$ ng add @ngrx/effects
After we did all of that, we can commit the changes and not that we have our first commit in the new branch we can push the branch to the GitHub (origin) repo and create a PR (Pull Request).
$ git add .
$ git commit -m "Install ngrx packages"
$ git push origin 1
Now if we go to the Pull requests tab on GitHub, we can create a new pull request for that branch (if you push the branch for the first time, GitHub will even suggest to create a PR).
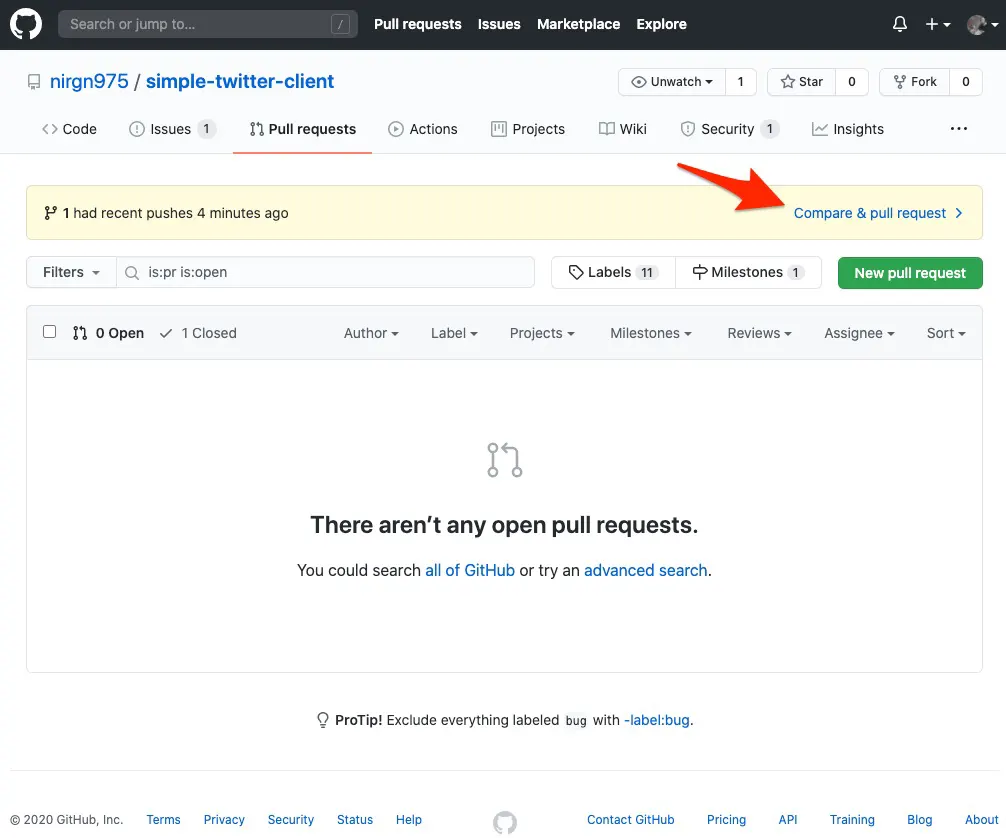
When we click on it, we redirect to a new page to edit the details of the new PR. For convenient we'll use couple of self conventions, we'll give the PR the title we used in the issue, we'll assign the PR to ourselves (because the issue is also assigned to us), and we'll write in the description that this PR is "Closes #1". This description is linking our PR with the issue, so if we hover on the #1 part we can see the issue details (if we click on it we're redirect to the issue page), and when we'll close this PR the issue will automatically will also close itself.
The last thing to check before we actually open the Pull Request is that the base branch is master and compare is 1. Because we want to open a PR for the branch named 1 and to merge it to the branch named master (which is our main branch in the project).
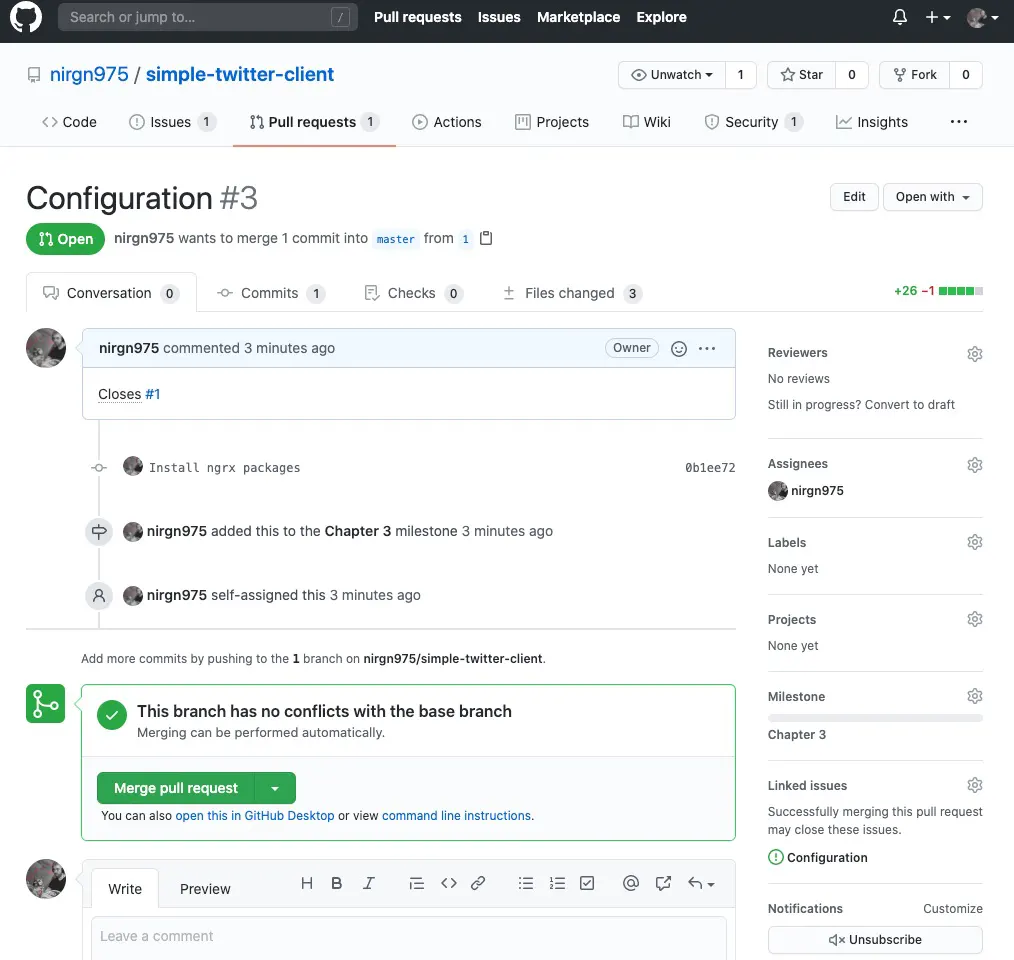
Now we can head over to the issue page and mark the first task as done. hooray! 🎉
The next package we need is the Angular Material. To install and configure it we'll also use the angular-cli add command, and we'll pick the "Indigo/Pink" theme for now, we'll choose Y to "Set up global Angular Material typography styles" and Y to "Set up browser animations for Angular Material".
$ ng add @angular/material
Last time (when we install ngrx) we were done by now, but with the material package we need to do some stuff, to get ourselves ready for the future. We'll use the material components pretty much all over our app, this means in the main module and also in the different modules we'll create, import, or navigate to. And the one thing we're not want to do is to import them in couple of places, this will not be fun and / or efficient (if we already import the component we want to use the same one and not to import another instance of the same thing - duplication).
To achieve that we'll crate a shard module to import all of the material components, and we'll import just that module to all of our other modules that need to use material components.
Shard module is just a regular module, we'll create a new directory inside of app called modules where we'll put all of our modules in. Next, we'll create our new module using the angular-cli. We'll call that module material and the ng cli will create a new directory for it, and a module file with the same name.
$ cd src/app
$ mkdir -p modules
$ ng g module modules/material
Now we have a new module, but it's not a "shard" one yet, we need to add an exports array to the NgModule object, so every module we add to the imports array should also be added to the exports array.
import { NgModule } from "@angular/core";
import { CommonModule } from "@angular/common";

@NgModule({
  declarations: [],
  imports: [CommonModule],
  exports: [],
})
export class MaterialModule {}
After we created our new shard module we need to import it in the main module, e.g. AppModule. So we'll add the line import { MaterialModule } from './modules/material/material.module'; with the other imports in the app.module.ts file, and add MaterialModule to the imports array. Your app.module.ts file should look like this:
import { BrowserModule } from "@angular/platform-browser";
import { NgModule } from "@angular/core";

import { environment } from "../environments/environment";

import { StoreModule } from "@ngrx/store";
import { StoreDevtoolsModule } from "@ngrx/store-devtools";
import { EffectsModule } from "@ngrx/effects";

import { BrowserAnimationsModule } from "@angular/platform-browser/animations";
import { MaterialModule } from "./modules/material/material.module";

import { AppRoutingModule } from "./app-routing.module";
import { AppComponent } from "./app.component";

@NgModule({
  declarations: [AppComponent],
  imports: [
    BrowserModule,
    AppRoutingModule,
    StoreModule.forRoot({}, {}),
    StoreDevtoolsModule.instrument({ maxAge: 25, logOnly: environment.production }),
    EffectsModule.forRoot([]),
    BrowserAnimationsModule,
    MaterialModule,
  ],
  providers: [],
  bootstrap: [AppComponent],
})
export class AppModule {}
To check if material is working we can import some angular material component (for example the button component) and add it to the app.component.html, then when we start our app we'll see the button rendered in the browser.
We'll add the below line to the material.module.ts file and add MatButtonModule to the imports array and the exports array.
import { MatButtonModule } from "@angular/material/button";
Next, we'll delete all of the content in the app.component.html file add add the below line instead.
<button mat-raised-button color="primary">Primary</button>
Then, when we npm start the angular app (run this command at the terminal when in the root directory of the project), and navigate to it in the browser at localhost:4200 we can see the button on the screen.

Now we should commit our changes, push it to GitHub, and we can mark another task in the Configuration #1 Issue as done.
2.4. Some basic stuff
The next 2 tasks in our issue is to create a core module and add some scss basic styling. The core module should be a shard module, like the material one, and it should contain all of the stuff we'll import in the different modules (like HttpClientModule, RouterModule, FormsModule, etc). It also will contain some shard code, like guards, models, services, and components (but it's not relevant now, we'll talk about it when we need to).
For now, let's create it and import and export some basic modules (that we know we're going to use). We'll create the module with ng cli
$ ng g module modules/core
And then imports and exports some basic stuff in it. Let's import the HttpClientModule, FormsModule and ReactiveFormsModule. The core.module.ts file should look like
import { NgModule } from "@angular/core";
import { CommonModule } from "@angular/common";

import { HttpClientModule } from "@angular/common/http";
import { FormsModule, ReactiveFormsModule } from "@angular/forms";

@NgModule({
  declarations: [],
  imports: [CommonModule, HttpClientModule, FormsModule, ReactiveFormsModule],
  exports: [HttpClientModule, FormsModule, ReactiveFormsModule],
})
export class CoreModule {}
Then, all that left to do is to import the CoreModule in the AppModule, like we did with the MaterialModule, and commit and push the new changes.
The last item on our issue's to-do list is the basic scss styling. This is just some css rules that we need to write in the style.scss located in the src directory.
html,
body {
  height: 100%;
  padding: 0;
  margin: 0;
}

body {
  margin: 0;
  font-family: Roboto, "Helvetica Neue", sans-serif;
}

a {
  text-decoration: none;
}
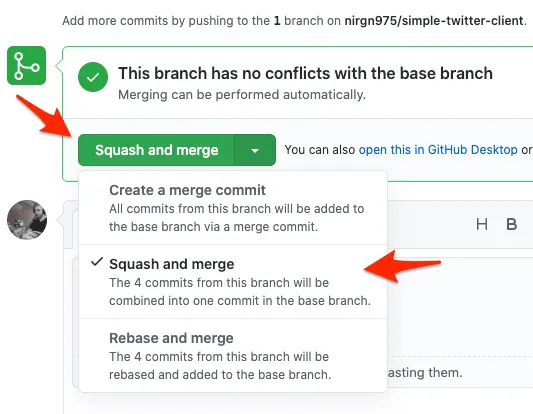
And now we can commit and push, again, and check all of the tasks in the issue. Before we'll merge the Pull Request (1) to the base branch (master) we'll go over the "Files changed tab" and check all of our changes that our PR is going to make to the master branch, just to check everything together for the last time, and when we're sure that everything is looking good, we'll head back to the " Conversation" tab and scroll down to "Squash and merge" the pull request.
2.5. Tests
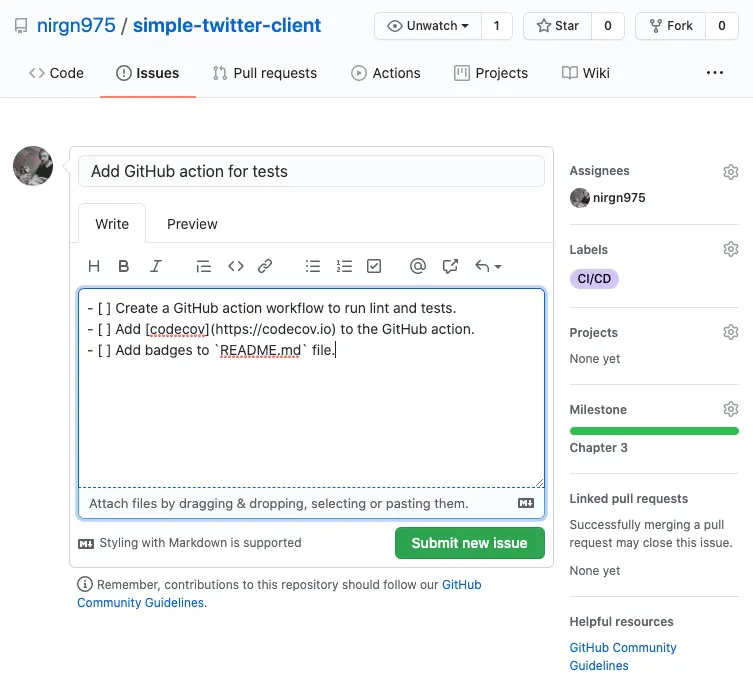
The next issue we'll open will be to add GitHub action workflow, for CI (Continuous Integration), the title we'll give it is Add GitHub action for tests, we'll assign it to ourselves, add a CI/CD label, and a description with a to-do list of all of the tasks we're going to do in this pull request.
- [ ] Create a GitHub action workflow to run lint and tests.
- [ ] Add [codecov](https://codecov.io) to the GitHub action.
- [ ] Add badges to `README.md` file.
In the terminal we're still on 1 branch, we need to go back to master branch, delete the 1 branch (because we no longer need it), pull the changes that we made in GitHub (origin) to our local machine, and then create a new branch named 4 (because that's the number of our new issue).
$ git checkout master
$ git branch -D 1
$ git pull origin master
$ git checkout -b 4
To run the linter and the tests we can check the scripts object in the package.json file, and we can see there is a test script, so let's run it
$ npm test
Now, some test are obviously will break, because we made some changes to the default project that the ng cli created for us, and didn't update the tests, so let's update the tests so every test will pass. In the first run of Karma we see that should render title test in AppComponent is failing.
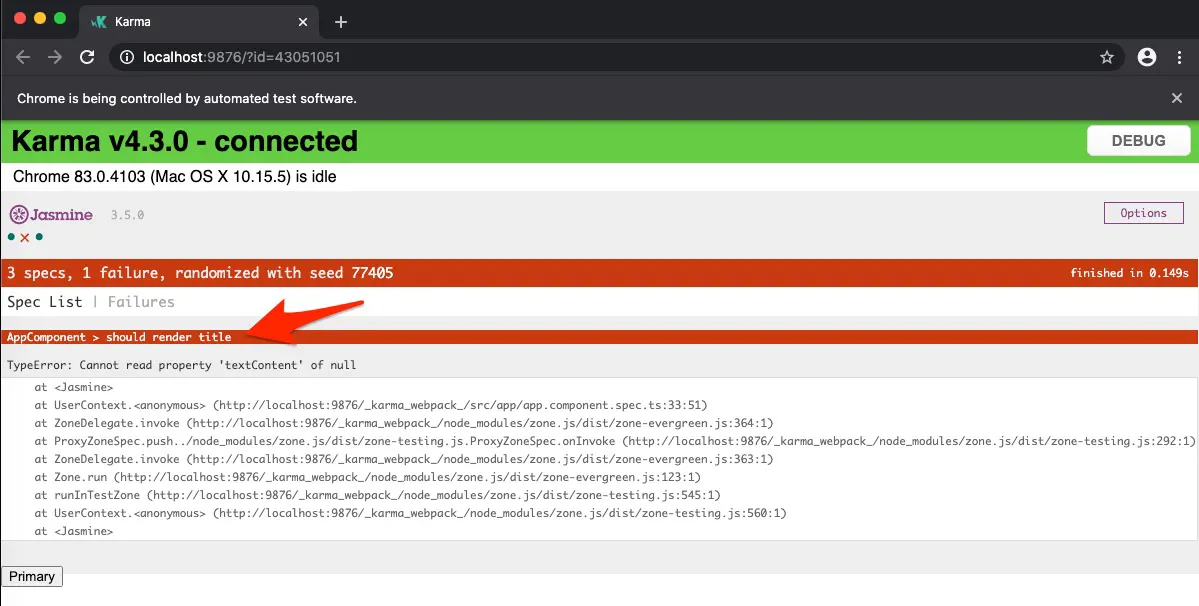
And it's obvious why it's failing, because it check if there is a span element in AppComponent with the class .content that his text is simple-twitter-client app is running!. And there isn't, because we delete the HTML of the AppComponent and replace it with a button. For now, we don't have anything to test, our AppComponent is pretty much empty, so let's just delete this test.
Next let's check if the linter is pass. We can do it by running npm run lint. If everything is good we should see on the terminal the line: All files pass linting..
So we're ready to create a GitHub action workflow that runs the lint and tests, great! If you don't know what GitHub actions is, go to there documentation page and read about it a little (it's basically a way to get a new and clean VM every commit and run a commands). We'll take the template of a basic Node.js action and start from there.
name: Continuous Integration

on: [push]

jobs:
  build:
    runs-on: ubuntu-latest
    strategy:
      matrix:
        node-version: [12.x]

    steps:
      - uses: actions/checkout@v1
      - name: Use Node.js ${{ matrix.node-version }}
        uses: actions/setup-node@v1
        with:
          node-version: ${{ matrix.node-version }}
From here, we'll add a command to install all the project dependencies, then run the lint, and then the tests, just like we run them on our local machine. So our final file should look like the one below.
name: Continuous Integration

on: [push]

jobs:
  build:
    runs-on: ubuntu-latest
    strategy:
      matrix:
        node-version: [12.x]

    steps:
      - uses: actions/checkout@v1
      - name: Use Node.js ${{ matrix.node-version }}
        uses: actions/setup-node@v1
        with:
          node-version: ${{ matrix.node-version }}

      - name: install dependencies
        run: npm install

      - name: check lint errors
        run: npm run lint

      - name: run tests
        run: npm run test
Now we can commit the changes and push the new branch. After that, we'll create a new PR for this new branch and we can notice that our GitHub action is start right away, with us doing anything. If you'll wait a little bit and let the workflow run, you'll see that it will fail, specifically the the run tests step, because it'll fail to start chrome to run the tests.
That's because we can run chrome in a headless VM (a VM without a screen), so we'll create a new npm script to run the Karma tests with a custom browser, the headless version of chrome. We'll call the script ci-test and the command will be ng test --watch=false --browsers=HeadlessChrome. Now we need to tell Karma what is this "HeadlessChrome" so we'll go to the karma.conf.js file and will add a customLaunchers right after restartOnFileChange. The customLaunchers will look like this:
customLaunchers: {
  HeadlessChrome: {
    base: 'ChromeHeadless',
    flags: ['--no-sandbox']
  },
},
Now when we run npm run ci-test the chrome runs in the background (without opening up), and we see the output of the tests in the terminal, so change our workflow step to run this command instead of npm run test and commit the changes and see if it works.
The next task is to add codecov, Codecov is a reporting tool that can process any coverage report format, it'll give us a clearer picture on how we're doing with our tests (what we already cover, and what's left out), so we can improve. The step is to get a token, so we can push our coverage to the platform, so let's log in to Codecov via GitHub login, then to add our repository and we'll get a token key.
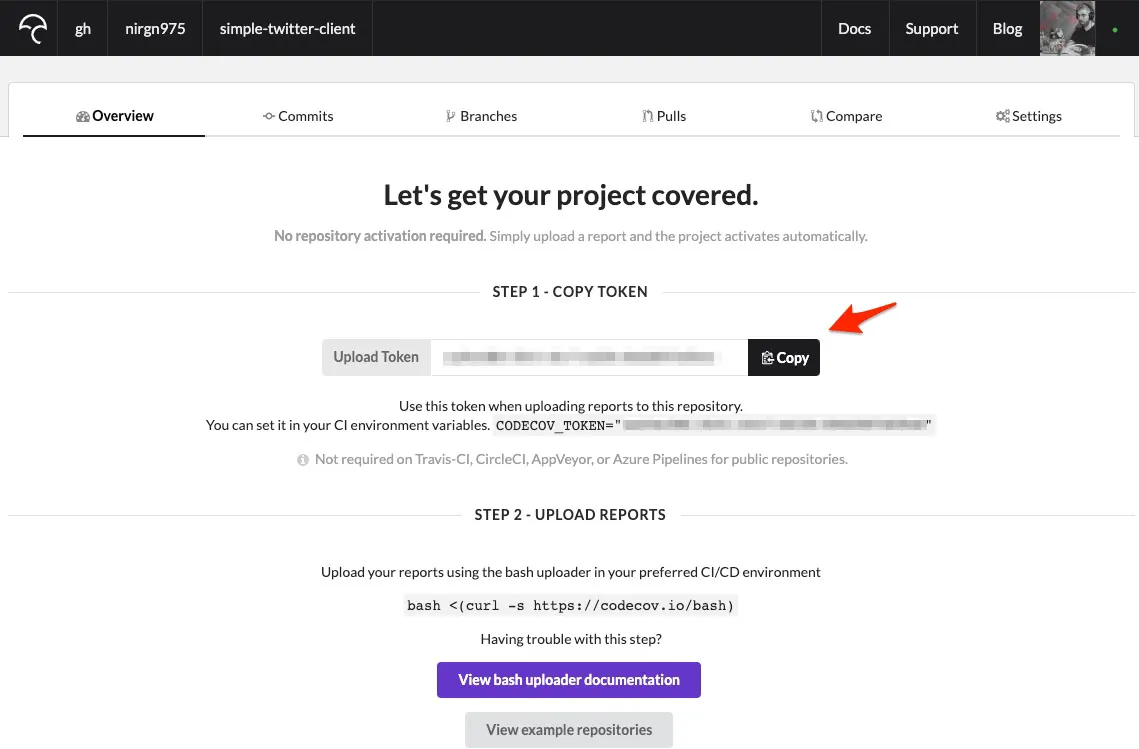
Let's copy it and head over to our GitHub repo -> settings -> secrets, and let's create a new secret. The name of our secret will be CODECOV_TOKEN and the value will be the token we copied from Codecov. We do this because our repo is public, and we don't want anyone to see our token (because we want to be the only ones that can push new coverage report to our repository report on Codecov).
Now let's use it in the GitHub action workflow. Angular already have all it takes to generate automatic coverage report from our tests, we just need to add the flag to the npm script command to do that. A simple google search tell us it's --code-coverage, so now our ci-test script will look like ng test --watch=false --browsers=HeadlessChrome --code-coverage.
And to push the coverage report that automatically generated by Angular we'll use the Codecov GitHub action Codecov already built. So let's add that step to our CI workflow, and tell it from where to get the token, and also to fail the CI if this step is failing.
- uses: codecov/codecov-action@v1
  with:
    token: ${{ secrets.CODECOV_TOKEN }}
    fail_ci_if_error: true
Because we didn't push the coverage to the master branch, we didn't see anything happen on our Codecov main page, because it can have a diff between the coverage from our master branch to our current branch (4) and tell us if we have higher or lower the coverage percentage, but that ok, it'll sort it self out once we'll merge to master. In the meantime we can check the branches Codecov page and see our branch (4) there, with the coverage report.
The third and last task in the issue is to add Codecov badge to the README.md file. We can get the badge code from the "Settings" page in our repository page at Codecov, and go to the "Badge" tab and just copy the markdown code to the top of our README.md file (just under the title of our repo).
Now we can check the last task in our current issue and we're ready to "Squash and merge" this PR to master.
3. Scaffolding Basic Server
I think we're ready to take a little break from the client side of the project and scaffolding the backend. Our backend side will be written with typescript which is a superset open-source programming language of javascript that developed and maintained by Microsoft.
Our backend code will be run on Node.js, and we'll use the express framework. The last tool we need is nodemon which is a utility tool that monitor for any changes in our source code and automatically restart the server.
Node.js and Express.js don't have any official cli tool to scaffold a basic project in a bit, like we had with Angular. But there are a lot of GitHub repositories with a basic project template, and all we need to do is to clone it and that's it. But I don't really like all that I found, so I made one myself, and we'll use it in this project. But we'll not just clone it and call it a day, we're going to built it from scratch, so we'll know how to do it in the future, and in the same time, get to know all the files and how everything is connected and working together.
3.1. Installation & GitHub Preparation
The first thing we need to do is to install couple of tools in our local machine. We already installed Node.js in the first chapter, so we have that, and npm. The next thing is to install typescript, and nodemon in a global mode.
$ npm install -g typescript
$ npm install -g nodemon
Let's head over to GitHub and create a new repo named simple-twitter-server, the repo should be empty, and public like we did with the client. Now let's clone it to our machine, and get inside it in the terminal.
$ git clone git@github.com:nirgn975/simple-twitter-server.git
$ cd simple-twitter-server
Now we just need to create a new npm project with npm init command, and we have answer the questions that npm asks as. The "package name" will be simple-twitter-server, and for everything else we can just press enter and accept the default value, we'll change it in a bit. The next thing we need to do is to start installing some packages.
$ npm install --save express
$ npm install --save-dev @types/express @types/node concurrently ts-node tslint typescript
The last thing we need to do is to add some scripts to start and build the project.
"scripts": {
  "start": "npm run build && npm run watch",
  "build": "tsc && npm run tslint",
  "serve": "nodemon dist/server.js",
  "watch": "concurrently -k -p \"[{name}]\" -n \"TypeScript,Node\" -c \"yellow.bold,cyan.bold\" \"tsc -w\" \"npm run serve\"",
  "tslint": "tslint -c tslint.json -p tsconfig.json"
},
Don't try to run them yet, because it's not going to succeed, we need to add some typescript configuration for it to work. But before we do that, let's just go over the scripts and understand them.
- The first one,
start, will be the script we'll use the most, it'll run the npmbuildscript and the npmwatchscript. - The next one is the
buildwhich is compile the typescript code withtsc(which is the default compiler of typescript and you have it because we installed thetypescriptpackage), and it runs another npm script namedtslint. - The
servescript run the compiled entry point file with nodemon (to watch for changes in the file). - The
watchscript run couple of commands in concurrently, with the concurrently package. It runs thetsccompiler and the npmservescript from above. The smart thing it's doing is to add the[TypeScript]or[Node]keywords to the beginning of the command and color code them with yellow if it's[TypeScript]or in cyan if it's[Node]. - The last script,
tslintis running the typescript linter to check for errors, and we give it some rules and configuration files.
Now that we know what every script do, we understand that we just need to create 2 files for the scripts to work, the rules (tslint.json) file and the configuration (tsconfig.json) file. So let's create them next to the package.json file, and we'll add some basic rules to tslint.json file:
{
  "rules": {
    "class-name": true,
    "comment-format": [true, "check-space"],
    "indent": [true, "spaces"],
    "one-line": [true, "check-open-brace", "check-whitespace"],
    "no-var-keyword": true,
    "quotemark": [true, "double", "avoid-escape"],
    "semicolon": [true, "always", "ignore-bound-class-methods"],
    "whitespace": [true, "check-branch", "check-decl", "check-operator", "check-module", "check-separator", "check-type"],
    "typedef-whitespace": [
      true,
      {
        "call-signature": "nospace",
        "index-signature": "nospace",
        "parameter": "nospace",
        "property-declaration": "nospace",
        "variable-declaration": "nospace"
      },
      {
        "call-signature": "onespace",
        "index-signature": "onespace",
        "parameter": "onespace",
        "property-declaration": "onespace",
        "variable-declaration": "onespace"
      }
    ],
    "no-internal-module": true,
    "no-trailing-whitespace": true,
    "no-null-keyword": true,
    "prefer-const": true,
    "jsdoc-format": true
  }
}
And then write the basic configuration for tsconfig.json file:
{
  "compilerOptions": {
    "module": "commonjs",
    "target": "es6",
    "noImplicitAny": false,
    "moduleResolution": "node",
    "skipLibCheck": true,
    "sourceMap": true,
    "outDir": "dist",
    "baseUrl": ".",
    "paths": {
      "*": ["node_modules/*", "src/types/*"]
    }
  },
  "include": ["src/**/*"]
}
Those configuration and rules are basic templates you can find on the documentation sites of typescript and tslint packages, so we'll not go over them. Now, we just need the server.ts file, so the tsc will compile it to server.js and and npm serve script will have something to run. The default path the compiler looks for this file is under a directory named src, so we'll create it there.
$ touch src/server.ts
Now, just to see some output on the screen and be sure everything is compiled and running we'll write console.log("hello world!") in the server.ts file. And when we run the project (with npm start in the terminal) we'll see "hello world!" in the terminal output.
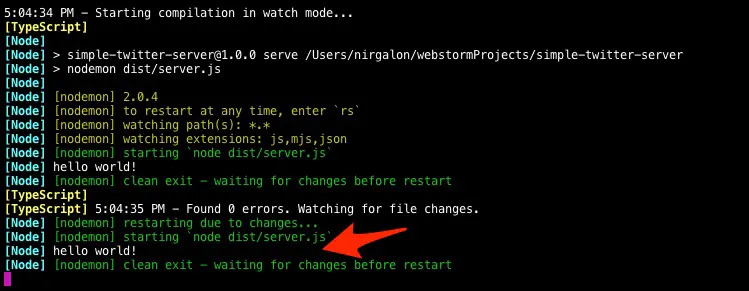
Before we commit everything, we want to add a .gitignore file, so we actually don't commit everything, because we don't need everything. What we don't need? the dist directory for example, it's a directory with files that are automatically generated from our source code, we don't need them, we just need our source code. And we don't need the node_modules directory, because it's a directory with all the packages that we installed and the rules to installed them are saved in the package.json file, so we just need to save that file.
We have a free website that can help us create this .gitignore file. gitignore.io, we'll add there some keywords like macOS, Node, linux, dotenv, and we'll create a file named .gitignore next to the package.json file and paste to it the output that the website will show us.
$ touch .gitignore
### dotenv ###
.env

### Linux ###
*~

# temporary files which can be created if a process still has a handle open of a deleted file
.fuse_hidden*

# KDE directory preferences
.directory

# Linux trash folder which might appear on any partition or disk
.Trash-*

# .nfs files are created when an open file is removed but is still being accessed
.nfs*

### macOS ###
# General
.DS_Store
.AppleDouble
.LSOverride

# Icon must end with two \r
Icon

# Thumbnails
._*

# Files that might appear in the root of a volume
.DocumentRevisions-V100
.fseventsd
.Spotlight-V100
.TemporaryItems
.Trashes
.VolumeIcon.icns
.com.apple.timemachine.donotpresent

# Directories potentially created on remote AFP share
.AppleDB
.AppleDesktop
Network Trash Folder
Temporary Items
.apdisk

### Node ###
# Logs
logs
*.log
npm-debug.log*
yarn-debug.log*
yarn-error.log*
lerna-debug.log*

# Diagnostic reports (https://nodejs.org/api/report.html)
report.[0-9]*.[0-9]*.[0-9]*.[0-9]*.json

# Runtime data
pids
*.pid
*.seed
*.pid.lock

# Directory for instrumented libs generated by jscoverage/JSCover
lib-cov

# Coverage directory used by tools like istanbul
coverage
*.lcov

# nyc test coverage
.nyc_output

# node-waf configuration
.lock-wscript

# Compiled binary addons (https://nodejs.org/api/addons.html)
build/Release

# Dependency directories
node_modules/
jspm_packages/

# TypeScript v1 declaration files
typings/

# TypeScript cache
*.tsbuildinfo

# Optional npm cache directory
.npm

# Optional eslint cache
.eslintcache

# Microbundle cache
.rpt2_cache/
.rts2_cache_cjs/
.rts2_cache_es/
.rts2_cache_umd/

# Optional REPL history
.node_repl_history

# Output of 'npm pack'
*.tgz

# dotenv environment variables file
.env.test

# Stores VSCode versions used for testing VSCode extensions
.vscode-test

### Deployment ###
dist/
Before we commit we'll create a README.md file ($ touch README.md) with some instructions.
# Simple Twitter Server

This is the backend of Simple Twitter project. This project is for educational purpose only.

## Our Stack

- [Express](http://expressjs.com)
- [Node.js](https://nodejs.org)
- [MongoDB](https://www.mongodb.com)

## Pre Requirements

1. [NodeJS](https://nodejs.org).
2. [TypeScript](https://www.typescriptlang.org).
3. [MongoDB](https://www.mongodb.com).

## Installation

1. Install nodemon globally `npm i -g nodemon`.
1. Install requirements with `npm install`.
1. Run the server with `npm start`.
1. Open your http client at [http://localhost:8080](http://localhost:8080).

**Configurations**

Create a `.env` file at the root directory (this file should not be commit).

Here is an example of the `.env` file:

```
DATABASE_URI=mongodb://localhost/simpletwitter
JWT=SIMTWITT
REFRESHJWT=RESIMTWITT
PORT=8080
LOG_LEVEL=info
NODE_ENV=dev
```

## Tests

- Run `npm run tslint` to check for ESLint mistakes.
- Run `npm test` to run the integration tests.
And now we have a basic npm project and we're ready to commit everything on master branch (because it's our first commit, we cannot open a PR because we don't have a default branch to compare it to it, yet), and push it to GitHub.
$ git add .
$ git commit -m "Init"
$ git push origin master
3.2. Basic Express Server with MongoDB
The next thing we're going to do is to create an issue. Because we have some code in master branch, we can now open an PR and compare it to master, so'll create an issue first and write there all of the tasks we plan to do in this PR.
- [ ] Basic express server.
- [ ] Load env files.
- [ ] Create a config instance.
- [ ] Connect to MongoDB.
Let's start with the first task, to create a basic express server. We'll do it in a separate file (we'll call it app) and then we'll import that exprerss instance in the server file.
But let's not forget that we first need to move to a new branch, and as usual we'll call that branch name like the issue number we just opend.
$ git checkout -b 2
$ touch src/app.ts
The first thing we want to do is to import the express package. Then we'll create a class named App and create there a local variable named app, it'll be from express.Application type. For this class we'll create a constructor and there we'll create an express application and save it in our app variable.
import * as express from "express";

export class App {
  public app: express.Application;

  /**
   * @class App
   * @constructor
   */
  constructor() {
    this.app = express();
  }
}
Next we want to create two private methods for that class, the first one will register some Middlewares, and the second one will register our future routes. Let's start with the first one, for all of the middlewares we'll use. But first what is a middleware?
Express middleware are functions that execute during the lifecycle of a request to the Express server. Each middleware has access to the HTTP request and response for each route (or path) it's attached to. In fact, Express itself is compromised wholly of middleware functions.
So let's install some packages that are middlewares. The cors package will help us to enable CORS. The morgan package will help us log all of the requests so we can keep track on what's happening with our server. The body-parser will help us parse the body of an incoming request.
$ npm install --save cors morgan body-parser
And then we can import them at the top of the file
import * as cors from "cors";
import * as morgan from "morgan";
import * as express from "express";
import * as bodyParser from "body-parser";
And create a method with the name configMiddleware in the App class, and use them with our express app.
/**
 * Registr middlewares.
 *
 * @class App
 * @method configMiddleware
 * @return void
 */
private configMiddleware() {
  this.app.use(cors());
  this.app.use(morgan("[:date[clf]] - :method :url :status :res[content-length] - :response-time ms ':user-agent'"));
  this.app.use(bodyParser.json());
  this.app.use(bodyParser.urlencoded({ extended: true }));
}
The final step is to create a router variable right after all the import statements.
const router: express.Router = express.Router();
We'll not use it yet, but we want to create it now because we know we're going to need it in the future. For now let's create a new method with the name configureRoutes and there we'll create a new endpoint in the root (/) path that we'll return us a simple text that our express app is working.
/**
 * Registr routes.
 *
 * @class App
 * @method configureRoutes
 * @return void
 */
private configureRoutes() {
  this.app.use("/", (_, res) => res.send("app is working!!!"));
}
And let's not forget that we need to call those methods from the constructor, so we'll add those lines right after our express app creation.
this.configMiddleware();
this.configureRoutes();
That's it, we have a basic express app. Let's head over to the server.ts file and use this app, so we can check that everyhing is working. In the server.ts file we'll import express and chalk. chalk is a package to help us styling our text in the terminal (we'll use it to add colors to our logs). The third import will be our app class we created earlier.
import * as express from "express";
import * as chalk from "chalk";

import { App } from "./app";
Now we'll create a server class and in the constructor we'll handle some Node.js errors and create an instance of that App.
/**
 * @class Server
 */
export class Server {
  public app: express.Application;

  /**
   * @class Api
   * @constructor
   */
  constructor() {
    // Set handler for all unhandled exceptions.
    process.on("uncaughtException", (err) => {
      console.log("Unhandled exception: \n\t", err);
    });

    // Set handler for all unhandled promise rejections.
    process.on("unhandledRejection", (err) => {
      console.error("unhandled rejection: \n\t", err);
    });

    this.app = new App().app;
  }
}
And at the end of the file we'll export an instance of the Server for testing (we'll use it in the future when we'll write out unit tests).
// Export for testing
export default new Server();
So everything is good, we create our App instance, but we need to listen to some port with this API. So let's add a new method with the name configurExpress in the Server class and set the express port and start listen on that port.
/**
 * Express configuration.
 *
 * @class Server
 * @method configurExpress
 * @return void
 */
private configurExpress() {
  this.app.set("port", "8080");

  if (!module.parent) {
    this.app.listen(this.app.get("port"), () => {
      console.log(chalk.cyan(`✨ App is running at http://localhost:${this.app.get("port")} in ${this.app.get("env")} mode ✨`));
      console.log(chalk.red(`✨ Press CTRL-C to stop✨ \n`));
    });
  }
}
And don't forget to call this method in the last line of the constructor.
this.configurExpress();
Now if we head back to the terminal and run the start command we can see our Express app is created and is listening on port 8080.
$ npm start

If we'll Insomnia to make a request to the root path on our localhost:8080 we'll get the app is working!!! text in return.

And now it's a really good time to commit.
$ git add .
$ git commit -m "Create a basic express app"
$ git push origin 2
If you want to take a look at my code, as always it available live on the repo of, here is the commit for the last chapter so you can see everything I just committed and follow along.
3.3. Configuration & Environment Variables
In this section we'll create a configuration file, this file will "read" the environment variables based on the environment we're currently in (prod / dev / test) and load the right configurations.
So, let's create a file called config.ts in a util directory, inside the src directory. In this file we'll use the dotenv and lodash packages, so let's install them.
$ npm install --save dotenv lodash
Now we need to create a class named Config in the new config.ts file we created. In this file we'll create a config object (variable) that will hold all of our configurations that we'll use later. and in the constructor of the class we'll use the dotent package to import the .env file.
import * as dotenv from "dotenv";
import * as _ from "lodash";

/**
 * @class Config
 */
export default class Config {
  public config = {
    logging: false,
    seed: false,
    db: "",
    environment: "",
    port: process.env.PORT || 4000,
    tokenExpireTime: 60 * 60, // 1 hours (in seconds).
    refreshTokenLife: 60 * 60 * 24, // 24 hours (in seconds).
    secrets: {
      jwt: process.env.JWT || "SIMTWITT",
      refreshTokenSecret: process.env.REFRESHJWT || "RESIMTWITT",
    },
  };

  /**
   * @class Config
   * @constructor
   */
  constructor() {
    dotenv.config({ path: ".env" });
  }
}
Now we'll create a .env file in the root path of the project, and just like we written earlier in the README.md file we'll add all the environment variables we need for the project. We already have an example for the .env file but I'll write it here again.
DATABASE_URI=mongodb://localhost/simpletwitter
JWT=SIMTWITT
REFRESHJWT=RESIMTWITT
PORT=8080
LOG_LEVEL=info
NODE_ENV=dev
Here is a short description that explaining what dotenv is doing.
Dotenv is a module that loads environment variables from a .env file into process.env. Storing configuration in the environment separate from code is based on The Twelve-Factor App methodology.
The last thing we need to do in the configuration file is to load the right environment file and merge it's content with the config variable. To do that let's create a new method in config.ts file and call it configDB. In this function we'll load the right file based on the NODE_ENV environment variable.
/**
 * Load testing or production environment variables.
 *
 * @class Config
 * @method configDB
 * @return config object
 */
private configDB() {
  process.env.NODE_ENV = process.env.NODE_ENV || "dev";
  this.config.environment = process.env.NODE_ENV;
  return require(`./envs/${process.env.NODE_ENV}`);
}
Now, we need to call this method inside the constructor and merge it's content with the config variable. To do this we'll use the lodash function called merge.
const envConfig = this.configDB();
this.config = _.merge(this.config, envConfig);
Our NODE_ENV environment variable is dev (because that's what we wrote in the .env file), so in the configDB we're trying to load (require) a file called dev inside a envs directory, but we don't have it yet, so let's create it. And a long side with it, let's create a test and prod files, so we'll have different configurations for each of the environments.
$ touch src/util/envs/test.ts
$ touch src/util/envs/dev.ts
$ touch src/util/envs/prod.ts
The test.ts file will have
module.exports = {
  logging: false, // disbable logging for testing.
  seed: true,
  db: process.env.DATABASE_URI,
  port: process.env.PORT,
};
The dev.ts file will have
module.exports = {
  logging: true, // enabled logging for development.
  seed: true,
  db: process.env.DATABASE_URI,
  port: process.env.PORT,
};
The prod.ts file will have
module.exports = {
  logging: true, // enabled logging for production.
  seed: false,
  db: process.env.DATABASE_URI,
  port: process.env.PORT,
};
The last thing we need to do is to import the config file in server.ts file.
import Config from "./util/config";
And then create an instance of the config class. We'll do it inside the constructor right after the line we create our express app.
this.config = new Config();
Now, if we'll run the project (npm start) the config class should be created and load our environment variables (we can check that out with a simple console.log command, but I'll leave you that job). If you want to take a look at the final code for this section, as always, you can head over to the Pull Request and look at the commit hash for this section.
3.4. MongoDB & Dummy Data
In this section we'll connect to the MongoDB database (we installed it already on our local machine in the first chapter) and we'll create a Seed file to load some dummy data to our database (we'll not load it yet, just create the file).
So, first let's connect to our Database. To do this let's install mongoose. Mongoose is an ODM (much like ORM just for NoSQL documents databases) and it helps us doing validation, casting and business logic. With mongoose we don't need to deal with the MongoDB client.
npm install --save mongoose
Now, let's import it at the top of the server.ts file
import * as mongoose from "mongoose";
The next step is to create a new function in server.ts file and call it connectMongoDB. This function will use mongoose to connect to the MongoDB database and log an error if something went wrong.
/**
 * Connect to MongoDB.
 *
 * @class Server
 * @method connectMongoDB
 * @return void
 */
private async connectMongoDB() {
  await mongoose.connect(this.config.config.db, {
    useCreateIndex: true,
    useNewUrlParser: true,
    useUnifiedTopology: true,
    promiseLibrary: global.Promise,
  } as mongoose.ConnectionOptions);

  await mongoose.connection.on("error", (error: any) => {
    console.error(`MongoDB connection error. Please make sure MongoDB is running. ${error}`);
    process.exit(1);
  });
}
And let's not forget to call it inside the constructor (right before we call our configurExpress method).
this.connectMongoDB();
While we're in the server.ts file, let's change the port we run our express app and take it from the config instead of hard coded it.
this.app.set("port", this.config.config.port);
Now, the last thing we need to do is to create our seed script, so we can load, in the future, some dummy data to our database, so it'll be easier to "play" with our endpoints and to write tests. So, let's create a seed.ts file.
$ touch src/util/seed.ts
We need to do some imports there and create a Seed class.
import * as _ from "lodash";
import * as chalk from "chalk";
import * as mongoose from "mongoose";

/**
 * @class Seed
 */
export default class Seed {
  /**
   * @class Seed
   * @constructor
   */
  constructor() {}
}
We'll create a new public method named seeding so we can call it from outside the class. This method will log some text so we can see what is going on, and then call a private method to clean the database (empty it from previous data) and we get a promise in return, when we'll get it we'll cal a new method (private one so we can only call it within the class) to create a new dummy data users.
/**
 * Seed the Database.
 *
 * @class Seed
 * @method seeding
 * @return void
 */
public seeding() {
  console.log(chalk.yellow("💦 Cleaning the DB 💦"));
  this.cleanDB()
    .then(this.createUsers);

  console.log(chalk.yellow(`Seeded DB with`));
  console.log(chalk.yellow("🎉 Finish seeding the DB 🎉"));
}
Now it's time to create the cleanDB method. It'll connect to the database using mongoose and will drop all the collection in it. After we'll drop it, we'll log that we start seeding the database (And let's add some emojis for fun).
/**
 * Clean all the database documents.
 *
 * @class Seed
 * @method cleanDB
 * @return promise
 */
private cleanDB() {
  mongoose.connection.dropDatabase().catch((error: any) => {
    console.error("error dropping collections", error);
  });
  console.log(chalk.yellow("💪 Start seeding the DB 💪"));
  return new Promise((resolve) => { resolve(""); });
}
Now, we don't have a user model or dummy data yet, so for the createUsers method, we'll just create it for now and leave it empty.
/**
 * Create fixtures for users.
 *
 * @class Seed
 * @method createUsers
 * @return promise
 */
private createUsers(data) {
}
The last thing is left to do is just run the seeding method when we need to seed the database. So let's head back to the server.ts file and import the Seed class.
import Seed from "./util/seed";
And inside the connectMongoDB method, right at the end of the method, after we already connected to the database let's call the method.
if (this.config.config.seed) {
  const seed = new Seed();
  seed.seeding();
}
That's it, we did it! Last not forget to add everything to the git staging area, commit, and push it. After that we can "Squash and merge" this Pull request.
4. Summary
This was a long post! I didn't plan for it to be that long. In the future they will be shorter. But we did a lot! we bootstrap our client and server applications. We're ready to write the first "custom" code for our Simple Twitter website in the next chapter. This is awesome!
In the next chapter we'll keep our focus on the server, we'll create the user model, some routes and endpoints, we'll add some auth endpoints and logic so we'll have everything ready to do the sign up and login processes, and of course write some tests because we have to tests our code to make sure everything is working correctly.
📖 You might also like
Change your email in GitHub

Once in a lifetime a man changes his email address. Maybe you didn't changed your email even once, I completely understand you, but I did. And let me tell you - it's not an easy process!
Releasing Software Is Hard! Is it?

One of the things I always got frustrated with is software releases and versioning.