Load Balancing Applications with HAProxy and Docker

A tutorial for a real world docker use case.
Recently I read a lot of articles about load balancing applications with Docker, Docker Compose, and Docker Swarm for my work. We have a couple of hundreds of instances and we need to manage them and do load balancing between them.
There are a lot of articles about this topic, but sadly the use case they present is quit simple and because of that they really don’t help. Here is a couple of examples to what I mean:
- Manually create hundreds of containers is not practical.
- Create hundred of containers each one on a different port is not practical.
- Write the containers ip and port manually in nginx conf file is not practical.
For that reason I decided to write this post and present the way we use. It’s not by any mean the “right” way or the only way, but it’s the way that works for us right now. Also, I’m assuming you know Docker, Docker Compose, and Docker Swarm.
1. Our simple application
Let’s start by creating our simple Node.js application. Create a file named index.js with the following code:
var http = require("http");
var os = require("os");
http
  .createServer(function (req, res) {
    res.writeHead(200, { "Content-Type": "text/html" });
    res.end(`<h1>I'm ${os.hostname()}</h1>`);
  })
  .listen(8080);
Now we need to dockerize the app, so we’ll create a file named Dockerfile with the following code:
FROM node
RUN mkdir -p /usr/src/app
COPY index.js /usr/src/app
EXPOSE 8080
CMD [ "node", "/usr/src/app/index" ]
To build a docker image of our newly awesome Node.js app from this docker file instructions we’ll write docker build -t awesome . in the command line, where our Dockerfile file is located.
Now we have a docker image of our simple (and awesome) Node.js app, and we can create containers from that image. Let’s say we need 20 containers of that app, so we need an automated way to create those containers and manage them. Also we need a container with some HTTP server to route and load balance the requests to our Node.js containers.
2. Enter Docker Compose
For our HTTP server we’ll use HAProxy, that means we need to create a container with HAProxy that will listen to port 80 and load balance the requests to the different Node.js containers on port 8080. To create our containers (Node.js apps and HAProxy) we’ll use Docker Compose, let’s write our docker-compose.yml file:
version: "3"

services:
  awesome:
    image: awesome
    ports:
      - 8080
    environment:
      - SERVICE_PORTS=8080
    deploy:
      replicas: 20
      update_config:
        parallelism: 5
        delay: 10s
      restart_policy:
        condition: on-failure
        max_attempts: 3
        window: 120s
    networks:
      - web

  proxy:
    image: dockercloud/haproxy
    depends_on:
      - awesome
    environment:
      - BALANCE=leastconn
    volumes:
      - /var/run/docker.sock:/var/run/docker.sock
    ports:
      - 80:80
    networks:
      - web
    deploy:
      placement:
        constraints: [node.role == manager]

networks:
  web:
    driver: overlay
Let’s explain what the hell is happening here. We create 2 services:
- The first service is our Node.js app (that call
awesome). It builds that service from an image that callawesome(that we previously built). We expose port 8080, and add an environment variable namedSERVICE_PORTSwith the port we exposed (we do it for the HAProxy, I’ll explain why later on). We also create 20 replicas from that image (20 containers) and have some update and restart settings for them. The important thing to notice is that we put all those containers in a network calledweb(we create the network later, in the end of the file). - The second service we create is
HAProxyfrom the haproxy Docker (the compony) uses in their cloud (we don’t build it and doesn’t create aDockerfilefor it, we just specify from where to pull the image). Itdepends_ontheawesomeservice, so it won’t boot until theawesomeservice is finished (i.e. all of the container are up and running). It’s also shared thedocker.sockfile (volumesfield). This is the file the HAProxy container needs to look at to learn about the containers in it’s network (new and existing containers). We expose port 80, and put this container in thewebnetwork, In thedeploysetting, we just tell it to always put this container on the manager node (this settings is related to Docker Swarm, when we have couple of node (i.e. servers). - The last thing we do is to create the network (named
web).

3. DockerCloud HAProxy
For our HTTP Server we use HAProxy, but not the regular version of HAProxy, we use the version docker uses in their cloud. That’s why we set an environment variable named SERVICE_PORTS in our awesome service, because this is the ports that will be exposed to HAProxy (we can put multiple ports there by separating them with comma). We also set an environment variable named BALANCE to set the load balancing algorithm to be leastconn and not roundrobin (which is what set in default).
3.1 Docker Swarm
Now let’s create a swarm (with one computer for now, but you can easily add more to the swarm). To do this we'll write docker swarm init and we created a swarm!! It’s also added our computer to the swarm, and because our computer is the first it’s also the manager of the swarm.
The network, the services, and all the containers called stack. To create our stack we need to use docker stack command, but we want to point the stack to our docker-compose.yml file, so it’ll build the stuck according to our plan there. We can do it by writing docker stack deploy --compose-file=docker-compose.yml prod. we use the deploy command to deploy a new stack (we’ll also use it to update an existing stack), we add a flag to point it to our docker-compose.yml file. And finally we call our stack prod (this is what came up in my head when I wrote those lines, sorry).
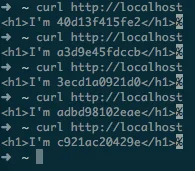
When we’ll hit http://localhost we’ll get the container id in the response, and we can see it has a different id every request.
Now let’s look at our services by writing docker service ls and we’ll see all of our services and replicas

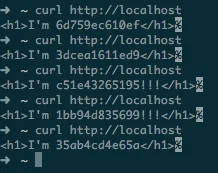
We can also create a second version of our awesome app. Let’s change the code a little bit (let’s add some exclamation marks at the end):
var http = require("http");
var os = require("os");
http
  .createServer(function (req, res) {
    res.writeHead(200, { "Content-Type": "text/html" });
    res.end(`<h1>I'm ${os.hostname()}!!!</h1>`);
  })
  .listen(8080);
So we need to build the image again, but this time it’s the second version of the app so we’ll write docker build -t awesome:v2 . and we’ll create an image called awesome but with a v2 tag. To update our containers in the awesome service to use the v2 version of our app (without stop the service) we’ll write docker service update --image awesome:v2 prod_awesome and our service called awesome, in prod stack, will update it’s containers five by five to use the second version of our app (why 5 containers at a time? because we wrote parallelism: 5 in our docker-compose.yml file.
We can see our docker slowly (but surly) kill the old containers and create new ones with the second version of our app. And when we hit http://localhost we still get a response, there is no downtime.
Also, if we want to scale the service to more than 20 containers, we can do it with only one command: docker service scale prod_awesome=50 and docker will start 30 more containers from the awesome:v2 image.
4. Summery
So, we don’t need to create hundreds of containers manually. We don’t need to place every container of our app in a different port. We don’t need to manually write our containers ip and port in ngninx/haproxy conf file. And we can do it with multiple servers (with docker swarm), with multiple services (with docker compose), update our application without downtime, and scale it up (or down) without downtime.
Hope it’s been practical, and I would love to hear how you do it in your compony!